Granite countertops with a single slab are designed to go with under-mount sinks. They are like Mac & Cheese, perfectly made for each other. It not only adds a modern look to your kitchen but also simplifies your countertop cleaning.
But why waste money on hiring someone to install the sink, when you can do it yourself with nothing but some tools. So let’s get right down to business on the general ideas of how to install an under mount bathroom sink to granite countertop.
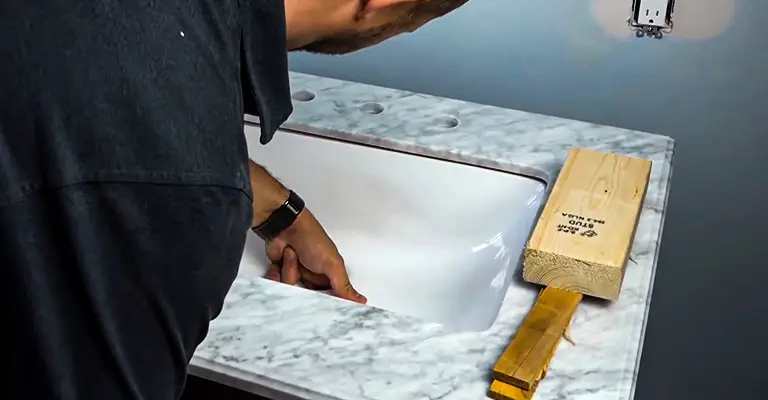
Table of Contents
Guidelines | How To Install Undermount Bathroom Sink To Granite
A number of precise cutting and sealing are ahead. But, in the end, don’t rush and turn it into a fruitless toil – take drying time into considerations. Silicone adhesives are generally sufficient to mount most bathroom undermount sinks to granite.
Step 1: Clean the Surface
First, you need to clean out the granite surface. Whilst granite counters are produced, they leave a significant amount of dust on the underside. These dust & debris can interfere between the bonding of silicone adhesive & the granite surface. So clean the underneath of the counter with a soft cloth before applying adhesive.
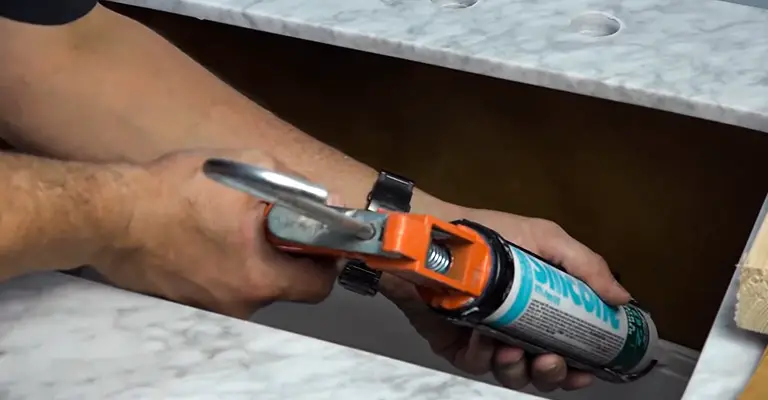
Step 2: Applying Silicone
After you have cleaned the granite you need to apply Silicone to seal the sink to the countertop. But you can’t apply every other Silicone caulking material. There are some silicone adhesives that have water repellent properties to bond the ceramic countertop. Make sure there aren’t any gaps anywhere.
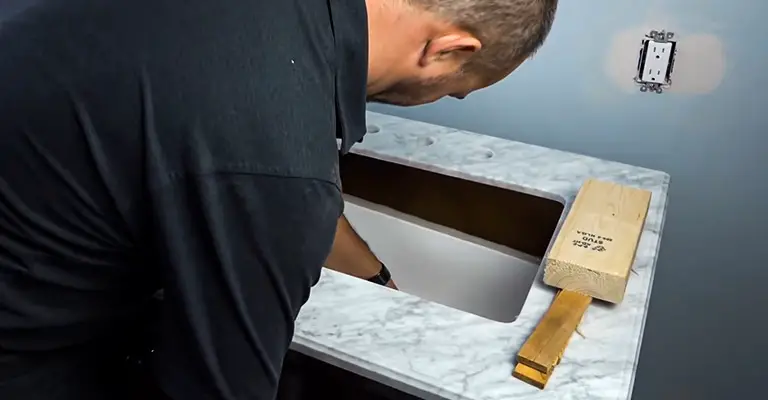
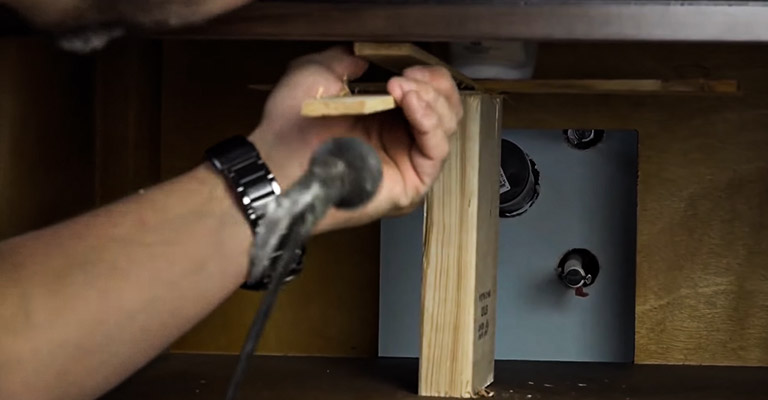
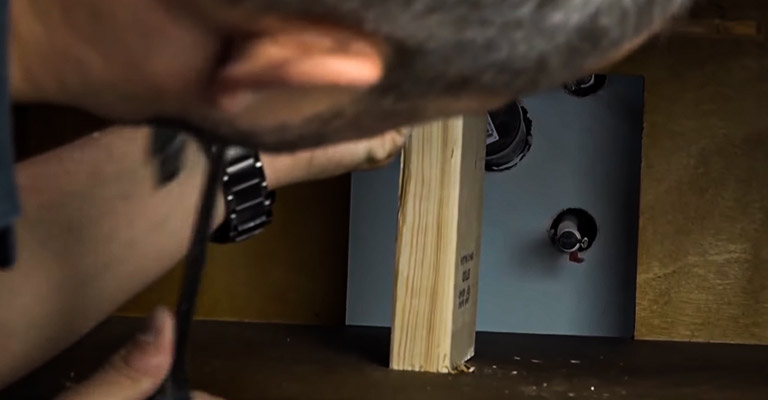
Step 3: Clamping the Sink into Position
For this part, you need a regular 12-inch bar clamp that detaches to hold the sink in position. Slide the long end of the clamp through the drain & attach the top of the clamp, make sure that the drain is not clogged. If so, then follow the steps to unclog the bathroom sink drain. Then, you can bring your sink right up to the countertop. Make sure the sink is perfectly aligned to the edges of the granite. You can take a look at how to unclog your bathroom ever easily.
Take a strong piece of solid wood to brace the sink up underneath the slab with a clamp while it’s drying. Leave the clamp a little bit loose so that you can make some to the sink position. When you are sure you have an even lip all the way around your sink. Once your sink is perfectly in position, tighten down the clamp the rest of the way.
Step 4: Strapping
To make sure your sink doesn’t fall off you have to strap the underneath. You have to use galvanized hanging straps right along the center of the sink. You can screw the ends of the strap at the sides of the cabinets. Along with the silicon, this strap will perfectly hold the sink to its place.
Make sure you cut the excess parts of the strap so that no hand’s cut by those sharp edges.
Step 5: Detaching the Clamp
After strapping the sink underneath, you can detach the clamps slowly without any worries of the sink falling off. The strap is in place to hold the sink against its own weight as the silicon dries off slowly. After detaching you can make some final checking whether everything is in the right position or not.
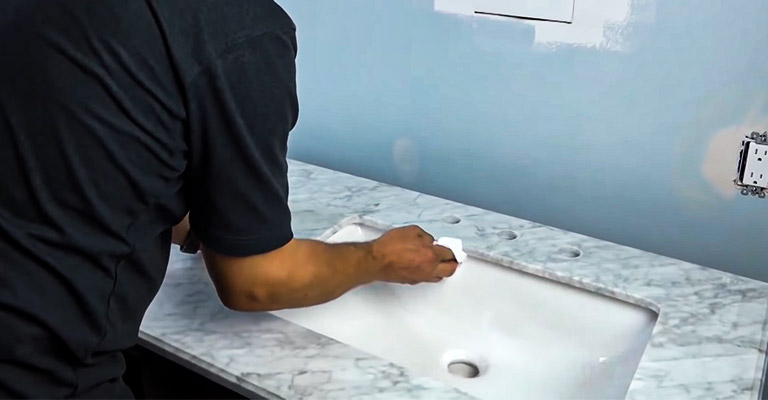
Step 6: Finishing Touches
Take a bit of acetone or rubbing alcohol on tissue & scrap the excess silicone off the sink. This also helps the glue to bond to the surface more easily. Smooth out the adhesives underneath the sink with your fingers to get that silicone all around the surface.
Step 7: Wait!
Now, after all the hard work is done, go get a drink & let the adhesive dry off. Be sure to follow the manufacturer’s guidelines on the drying time. After it is dried off, the plumping work can be performed.
Precautions for the best results
Choose a compatible sink
During the measurement and shopping stage, make sure that you first get accurate measurements for perfect installation. With the right set of numbers, you can buy a compatible sink that not only fits your granite countertop precisely but also adds some detailing to the final results. Undermount sinks need to be checked for granite compatibility, as not every type of undermount unit will pair well with granite. Another important consideration is the kind of appearance you are aiming for. Undermount sinks can be installed in positive-reveal, negative-reveal, and zero-reveal styles based on how much of the sink rim you want to be exposed. Zero-reveals are quite popular because of their aesthetic appeal and seamless, flush-mount installation where the sink rim completely meets the countertop hole. This keeps your sink cleaner, prevents rim buildup, and cuts down mold growth. For DIY pursuits, a zero-reveal installation can be a little tough to accomplish due to its very specific and precise nature – so do not hesitate to take an expert’s help!
One extra precaution here would be regarding countertops that do not have a precut sink hole – like when you are starting everything from scratch and have custom requirements. The opposite is when you are simply replacing the old sink but reusing the countertop – that already has a hole. So, in this case, you just need to buy a compatible new undermount sink. Homeowners with custom requirements might choose to install an undermount sink towards one corner so that more countertop area is left free. They can also opt for a two-sink countertop. Likewise, custom faucet/plumbing/stopper installations may need extra countertop holes to be drilled, so such customizations need careful planning early on. As a DIYer, you should take your granite countertop to a fabricator and have the hole cut out exactly how you want it.
Now would be an excellent time to have your custom faucets, hardware, and undermount sink “added to cart” so that everything arrives on time for the assembling process. If you have a complete vanity makeover planned ahead, have an expert look at your ideas and fine-tune the details for perfection before you pick up any tools. There is nothing like a misaligned sink or faulty measurements to ruin the day – add 2 sinks to the vanity, and you have twice the problem!
Install the sink before the countertop
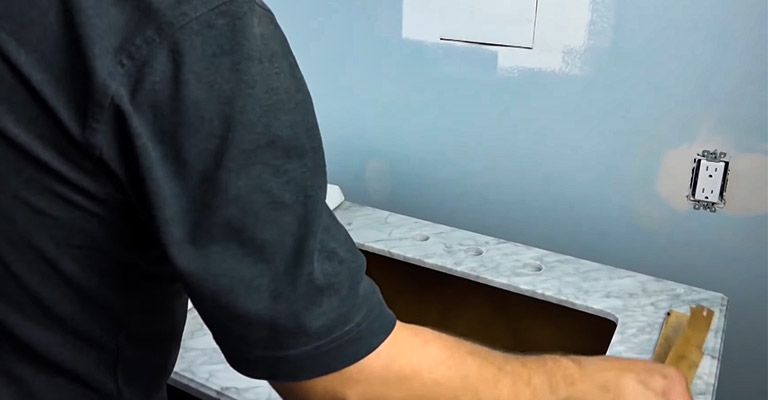
Always begin by turning off the water supply to your bathroom sink so that you do not encounter any leaks later on. As mentioned above, new granite countertops have a lot of dust, so you need to thoroughly wipe down the surfaces to ensure proper sealing. If you use any cleaners to wipe the surface, allow the granite to dry off completely before you apply any silicone adhesive. In most cases, it is recommended to first install your undermount sink to the granite countertop and then mount them together in place – as opposed to mounting the countertop first and then installing the sink like you would with a drop-in sink. This is because undermount sinks are installed underneath the counter hole rather than on top of it, so it will be safest and easiest to work on a granite slab that is placed upside down on the ground. This also allows the silicone adhesive to bond well, let the sink stay stable resting on it, and create a secure seal that is durable.
If you mount the sink to an already installed countertop, chances are that the silicone will not stabilize enough to hold the sink – as this is a race against gravity itself! The sink can easily detach and fall as a result. So, place the granite countertop upside down on the ground, mount the sink and seal it in place, and wait for the drying time to pass before installing the now complete countertop to your vanity. You can check to make sure that the sink has set properly and is not moving or loosening up before turning the countertop the right way – if it is a heavy unit, call for an extra pair of hands! You do NOT have to do literally everything by yourself in your DIY project, and averting accidents and breakage is always important.
Consider a good mounting system
Gravity is not the only culprit. Sometimes, undermount sinks can separate or detach from their granite countertops also because only a single bead of silicone was used to hold them in place. Depending on the weight and size of your combined unit, make sure to follow the given instructions and apply the right amount of adhesive needed to secure the sink to the granite countertop.
Apart from proper sealing quantity, you will need a reliable mounting support for extra stability and safety during the drying period. To support the combined weight from below, you can use galvanized hanging straps as we discussed in Step 4. You can also use clips or other bathroom sink mounting kits to hold the setup securely as it dries off. In this way, your undermount sink will get maximum contact with the adhesive and no longer present the risk of falling over time. An important precaution here is to avoid tightening the mounting clamps or straps too much so that you can adjust the sink if needed AND prevent the sink/countertop from breaking! Excessive pressure from overtight clamps while mounting or from a drill machine while drilling holes can easily break the sink and granite. So, take extra care during this process and avoid costly replacements.
Ensure regular maintenance
Cleaning/maintaining your newly installed undermount sink and granite countertop is simple, especially if you have chosen a zero-reveal setup. Regular cleaning is important to prevent any intrusions from germs and mold – and simply to keep your vanity shining in prime condition. If you notice that the silicone adhesive is falling apart, you can always apply a new layer to refresh the aesthetics. This will also help your undermount sink stay secured to the granite countertop over time. Good cleaning and maintenance increase durability and functionality, and you might have to plan a thorough cleaning process every once in a while. This should include unclogging the drain and removing and cleaning the bathroom sink stopper – and we have explored this in a separate article if you would like to read it for more information.
Wrap Up
Before doing any DIY task, having your research done thoroughly means half of the work is done already. Don’t rush into doing things. Make sure you take every step carefully, otherwise it may lead to accidents. Last but not least, don’t be shy if you need an assist from a friend to ease your work.