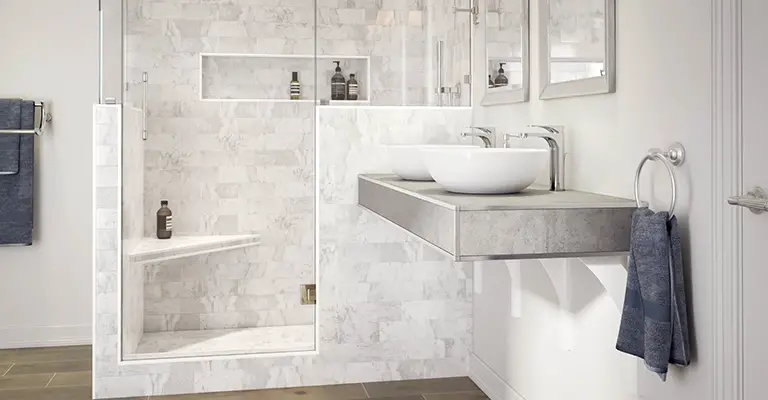
Floating shower benches are great for relaxation during or after showering or to support shower accessories as shower storage. Although shower benches come in different sizes and shapes, the fundamental processes of installation are almost similar. With proper preparations and precautions, you can install one yourself.
Hereby onward, we will explain two methods for building a floating bench. Depending on the shower area, you can determine which method is most appropriate. As we sail towards the end, seeking advice would just seem sarcasm to you.

Table of Contents
How to Build a Floating Shower Bench
Floating shower bench is a perfect combination for a walk-in shower. For this option, we’ll show you how to install a standard floating shower bench using brackets. Not only they are durable and comfortable, but they are also resistant to wet environments making them perfect for shower purposes.
Step 1: Preparation
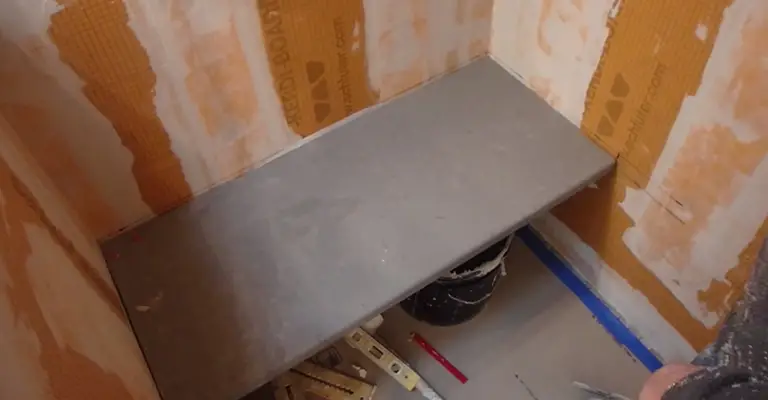
To get started, get yourself a wooden shower bench which should be about 15 inches deep and at least 3 inches in thickness. The length of the board doesn’t matter much as you’ll have to shape it par your requirement to fit the bath area. Also, gather other utilities such as drill machine, silicone adhesive, circular saw, and two Sutherland bench brackets.

Step 2: Cut the Bench to Size
Once you’re done with the design specifications and preparations, it’s time to shape the bench to size. Use a circular saw to cut the bench down to your required size. We recommend using a circular saw cause it gives you a clean and clear cut.
If you’re not comfortable with a circular saw, then you can make use of hand saw. While there’s a fair amount of chance that you won’t get a nice cut, it should be just enough to get by. In case you’re not sure about using either of these, try contacting a lumberyard worker to get it done.

Step 3: Measure the Positioning
The next step is to measure the horizontal positioning of the bench bracket and mark it using a carpenter’s pencil. After that, measure the vertical positioning of your bracket from the floor and again mark it. Anywhere between 20 to 26 inches is the normal bench height.
Now extend both horizontal and vertical lines using a level. The extension of the horizontal line should be nearly equal to your bench length. Get the Sutherland bench bracket and locate the center of the top flange. After the locating is done, mark a centerline.

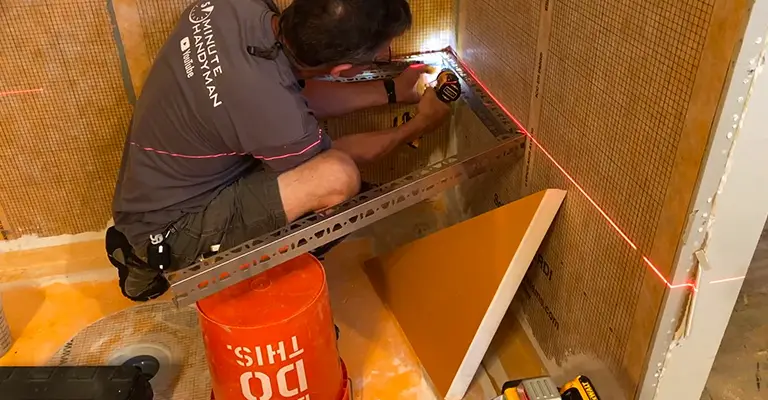
Step 4: Align the Bracket and Mark Drill holes
The next step is to align the top and center of the bracket with the lines on the wall. While holding the bracket in that position, mark the drill holes.

Step 5: Drill the Fasteners
Drill a pilot hole in one of the markings using a drill bit that is smaller than the inner diameter of the fastener you’re going to use. Then again take the bracket, place it on the wall and tighten the first fastener smoothly to the hole you just made. Level the bracket carefully and tighten the fastener completely.
Drill the remaining pilot holes with the same drill bit you used previously. Similarly, install the rest of the fasteners and tighten them up firmly.
As for the other Sutherland bench bracket, follow the same procedures to secure it on the wall. Make sure both of the brackets are on the same level.
Step 6: Embed the Bench Using Adhesive
The last step is to fetch your bench material and attach it to the brackets. Use silicone adhesive to secure the bench to the brackets. And just like that, you will have your floating shower bench.

Alternative | Installing a Corner Floating KERDI Bench
How to install a floating corner seat in the shower? You can use a KERDI board for custom design and specifications. They are waterproof and solid. Typically a corner floating bench is installed during tile installation. Making this type of bench requires the following steps.
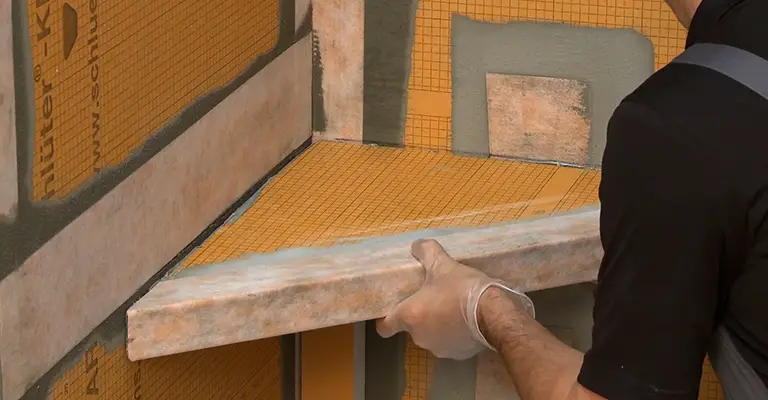
Step 1: Shape a KERDI Board to Fit Your Bath Area
Get a KERDI board with a minimum thickness of 2 inches. Use a circular saw to cut the board and to fit your design specifications.

Step 2: Install the Profile
Use a KERDI-BOARD-ZA or -ZB profile to reinforce the panel. To install a profile, make use of thin-set mortar. As the edges are exposed to a wet area, seal them and the joints up by KEDRI-BAND. Install the band using a thin-set mortar.
Step 3: Apply and Smoothen the Mortar
Apply the mortar using a V-notch trowel. Mix the mortar smoothly so that fluid consistency is ensured. Now set the membrane using a drywall finishing knife. Ensure that the 2 inches overlap at all seams and penetrations.
The bench should be installed using a thin-set mortar. Spread out the mortar to cover the whole surface of the bench that will meet the wall.

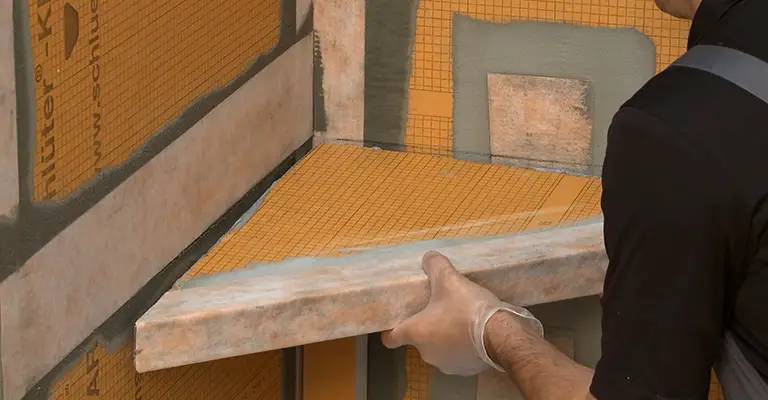
Step 4: Embed the Bench Using a Support
The final step is to set the bench into place at an elevation of 19 to 22 inches. Use support underneath until the thin-set mortar sets. Make sure a proper slope is ensured so that water doesn’t accumulate.
Floating shower bench – key considerations
Following are some benefits, tips, precautions, and safety aspects regarding a floating shower bench, and hopefully, they will help you with a safe, durable, and successful project!
Versatility
Floating shower benches have nearly the same benefits as box-type or built-in shower benches. They are much more affordable to install, can be added anytime to existing shower spaces, and are available in different configurations. For example, corner shower seats and foldable benches allow you to save more space while actually utilizing the available space in the best way possible. As discussed above, you can build a floating shower bench either as a complete slab or a corner seat depending on the size of your shower area. Add in a simple and reliable bracket hinge support, and you have a folding bench that opens and folds up or down. Compared to the space limitations with a box-type shower bench, this versatility with a floating bench is a huge plus.
Full-length slab benches also allow for some top and bottom storage for your shower essentials, brushes, cleaning supplies, etc. Apart from good aesthetics, you must also consider space optimization in terms of better access, shower coverage, need for grab bars, built-in/alcove storage for accessories, and so on.
Slab/board materials
A range of materials is available for a floating shower bench slab or corner seat board. The more expensive ones include stone, granite, marble, and quartz. If your bathroom’s countertop and tiles already match these materials, it is a great opportunity for seamlessly incorporating such a bench slab into your shower stall. Wood is often used as a cheaper alternative for DIY projects. However, it is not the best choice of material for a wet environment such as a shower space.
Teak and bamboo, on the other hand, are quite popular materials for shower benches – and make a great choice for bringing some sauna vibes to your shower! In the end, you do need to pick a water-resistant material for your floating bench and make sure that it is extremely durable, supportive, and reliable to use.
Installation
It is much easier to install a floating shower bench or corner shower seats compared to box-type benches, so these projects appeal greatly to DIY audiences. This form of installation usually requires a holding bracket that runs along the “wall” side of the bench, thereby creating a seamless and “floating” appearance. You will need your chosen slab or board and the relevant bench kit for a complete installation. Just follow our guide on how to build a floating shower bench using the steps given above, and you are good to go! DIY installers also refer to video tutorials for specific projects and configurations that match their ideas. You can always explore Pinterest for brainstorming new ideas and see how the installation will work for your given shower space. That said, it is extremely important to get the installation right and carefully executed with proper finishing and sealing.
The best part is that a floating bench can be incorporated into your existing space whenever you want, as it does not involve any demolitions or hefty structural changes. This makes it a perfect choice for bathroom remodels. They simply need to be drilled into the walls with the correct hardware and sealing precision. The main checkbox for installing a floating bench is COMFORT – anything that gets in your way or steals the shower coverage will just be a failed project. You do not want the bench to be so wide that it leaves little shower room. Likewise, you might not want the bench to be outside of the spray coverage. It also has to be at the right height for you to sit and stand back up comfortably. So, proper space planning and utilization are crucial before you install the bench.
Safety aspects
A significant part of the bench’s installation is its safety aspect, so we have included this as a separate category to give it some undivided attention. Box-type shower benches offer maximum support to anyone who sits on them, as the bench design reaches the floor completely. There is no danger of a box-type bench snapping lose or breaking. In comparison, floating shower benches pose a risk of injury and accidents in terms of improper installation and weight incompatibility.
The way you install a floating shower bench and the type of material you choose both determine how safely the bench can be used. Since there is no support underneath the bench, some people might prefer installing a box bench instead. Ideally, a floating bench or corner seat should support a weight capacity of around 400 pounds. You must confirm the supported weight of your chosen slab/board before buying it and make sure that the final installation will be really worth it. The bench should be sturdy, reliable, and securely installed so that it does not collapse under the added weight. You can always call in a professional for help, inspection, and approval before using your newly installed bench.
Mold and mildew are other safety concerns. Floating benches have hardware that needs to be drilled into the shower tiles. If you are not careful during the installation stage, moisture can sneak into any gaps and holes and cause an unsightly buildup. To prevent this, you must seal any exposed gaps with proper sealants. Teak and bamboo shower benches will also benefit from some level of waterproofing so that they do not retain moisture over time.
Floating shower benches, corner seats, and kits
Here are some available buying options for floating/folding shower benches and corner seats.
Shower Floating Bench – Schluter Kerdi-Board 2″ – 17×17
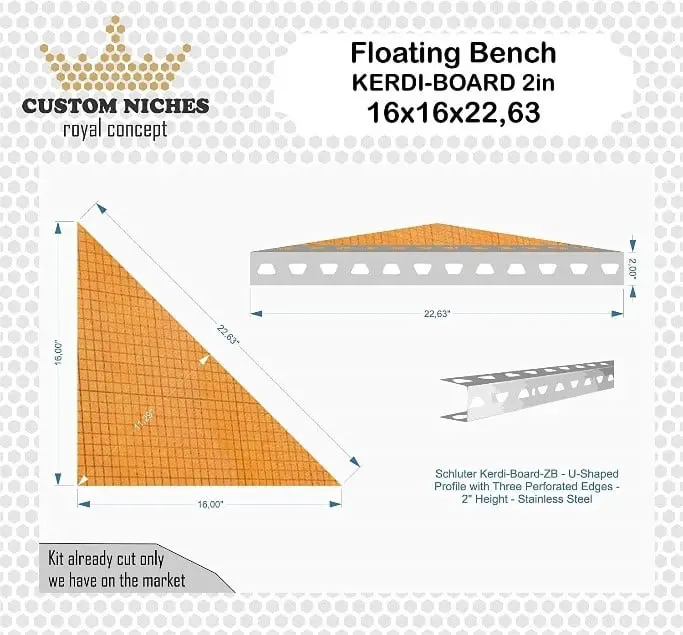
This Schluter Kerdi kit includes a corner shower suspended seat measuring 17 x 17 x 22.63 inches. It is designed to support 400 lbs. The bench is cut, finished, waterproofed, and ready to install right out of the box! You do not need to add any extra waterproofing layer or worry about filling in mud – which saves you a huge step during installation! It is super easy to install this bench if you know what you are doing. The corner seat makes a useful addition to small shower spaces.
Covered with matching shower tiles, it simply looks great in walk-in showers and enhances the overall look.
Goof Proof Shower GPSS-3024 Triangle Tiled Shower Seat, Easy to Install Bench for Shower Stall, 30″/24″
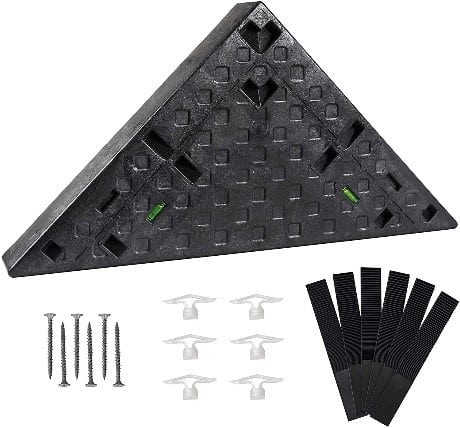
This is another turnkey kit for a complete installation. The Goof Proof Floating Corner Seat is made of heavy-duty molded plastic and can be tiled the same day once you have it installed. Guide marks on the surface will help you trim the bench to 24 inches if you do not want the 30-inch width, so adjustability is a nice bonus. It has a built-in slope to allow water to drip away – which is a clever feature in a floating bench! The bench also includes built-in level vials to help you install it accurately – so no more guesswork involved! The kit comes with screws, toggle anchors, and shims. The included hardware supports both new and retrofit installations, allowing you to mount the floating shower bench to wall boards as well as tiles depending on your project. Needless to say, this floating shower bench kit received top reviews, most of which came from DIY users who were glad to retrofit their existing shower space with a compatible bench.
Corner Shower Seat Tile Ready – Natural Stone – 18″ (Silver Travertine)
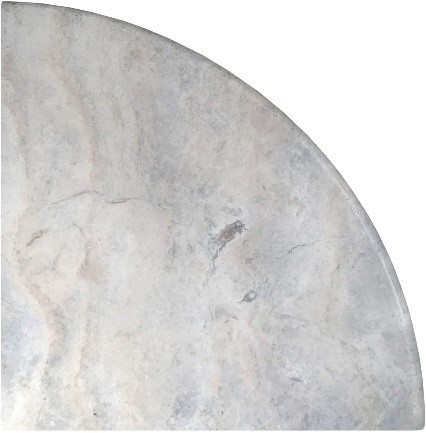
Stella Sealants offers a silver travertine corner seat measuring 18 x 18 x 1.25 inches. It weighs 27 lbs. and has a curved edge which makes a great choice for those who do not like triangular corner seats. Once mounted correctly to the corner walls, the seat offers perfect support and durability for long-term use. It has no supporting hardware underneath, and you can install it based on our instructions or by watching any corner shower seat tutorial.
Wall Mount Fold Teak Shower Bench | Bohemian 18.7 in x 12.4 in Bathroom Accessories Folding Teakwood Shower Seat for Inside Shower for Bathtub | Spa Foldable Wooden Bath Chair for Seniors | AC-AZ202…
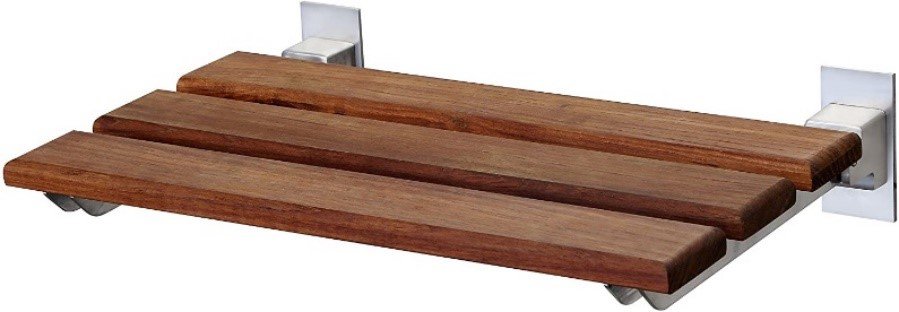
We talked about installing foldable shower benches earlier. This folding teak shower bench from the ANZZI Bohemian series is the best example. It measures 18.7 x 12.4 x 12.5 inches and has a floating style because of its hinged bracket system. You can simply fold it up when not in use, which is quite helpful in limited and enclosed shower stalls. The bench has RHINO ALLOY certified stainless steel/aluminum hardware supporting the teak wood seat. All the mounting accessories are included with this floating and foldable bench. Its solid surface makes a comfortable seat and adds spa-like aesthetics to your shower area. The seat can easily hold a weight capacity of up to 350 pounds when installed correctly and efficiently. To prevent collapsing dangers and injuries, make sure to call in a professional if you cannot install the bench on your own. Also, confirm the weight compatibility before buying it so that everyone can use the bench safely without accidents.
Epilogue
Building a floating shower bench is a task of great accurate measurement and they are different from building a shower bench. Whatever your build process is, the key is that you must always make sure your bench is tilted forward a bit to drain off water. As for the height, it depends on the preference of the user. So don’t always go for the standard.
Your bench doesn’t need to be huge either. The processes may seem a bit complex to deal with, but maintaining them strictly will certainly give you the best possible outcome.
You may also like to read: How to keep the shower dry.