You may be considering redoing your shower as part of a bathroom renovation. To ensure the longevity of the shower, you will need to properly waterproof the base and walls, whether your shower is tiled or prefabricated. Installation of a shower pan is part of waterproofing the shower floor. Making your own concrete shower pan is possible if you so desire.
Likewise, if you’re a pro in search of a more effective method for concrete shower pans, you’ve come to the right place. Looks like the vintage clients are still in towns. No need for the amateurs to back off. Take up your materials on hand, we’ll be right here beside you.
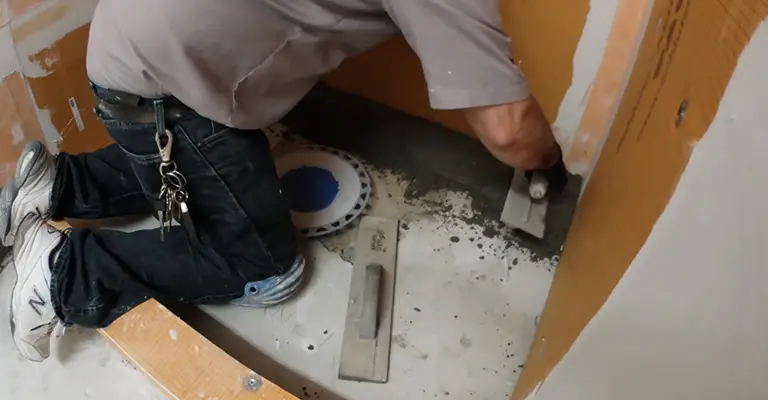
Table of Contents
1. Measurement
At first measure the area that you need. Then get a PVC sheet according to the measurement. You can place the draining anywhere but make sure the system is built well. Don’t cut the sheet too low it will cause leaking. After setting up the PVC sheet you have to place the shower pan.
2. Installing the Pan
Take the shower pan and cut the necessary area from the PVC sheet. Put the pan on it and squeeze the pan in to set that. You can use some liquid Teflon to make sure that the pan is perfectly sealed. Once the set up is ready, prepare for the floor masking.
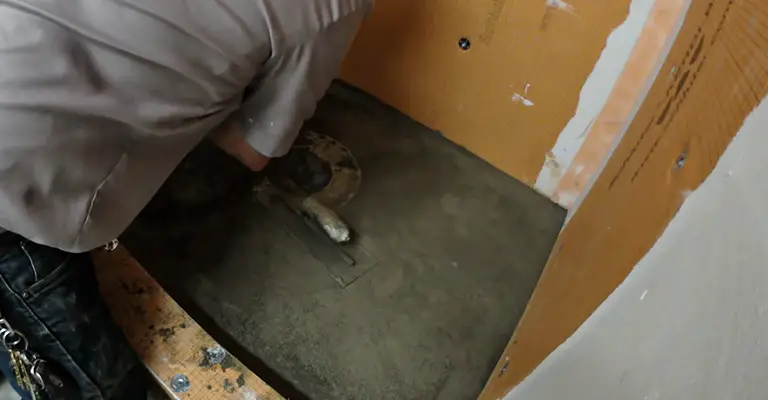
3. Masking
It’s very important to make the clay with perfect consistency. For the base make the clay with perfect consistency. By adding water slowly and mixing it with the clay.
After getting the required consistency you are good to go. Apply the clay on the base and level it properly. Before applying the clay make sure to cover the shower pan or clay will block it.
When the clay will dry then you have to cover the entire floor with a rubber sheet. The rubber sheet is very important for the floor as it will seal the floor and make it leak-proof.
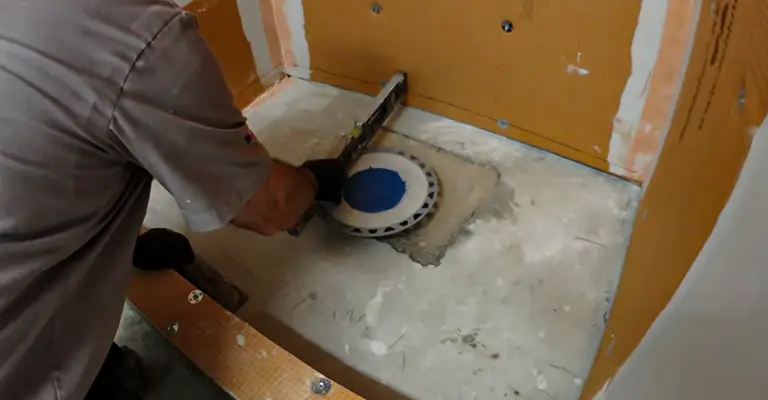
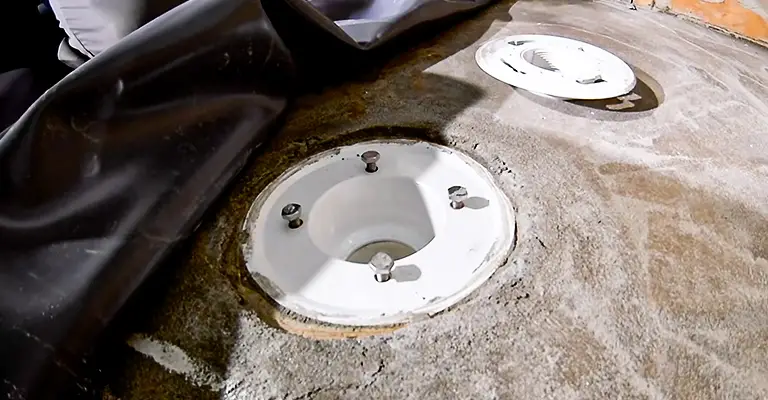
4. Drain Set Up
Measure the first layer of the drain and cut the membrane accordingly. Install the first layer. You can use glue to seal properly. After that put the next layer and tighten it using screws.
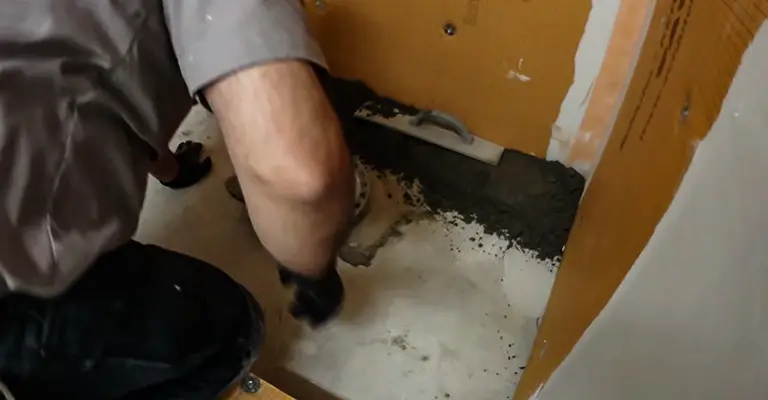
5. Concrete Layering
The next step is to put the concrete layer. The concrete layer will cover all the previous layering. Before that, you have to assemble the third layer of the drain. It will fix the height of the concrete layer. After completing the drain work put the last layer on the floor. Work gently in the area near the draining pan.
6. Tile Layering
For making the shower floor more appropriate add a layer of tiles. Tiles will help. The draining of water also. But for that, you have to keep a sloop on the floor towards the drain.
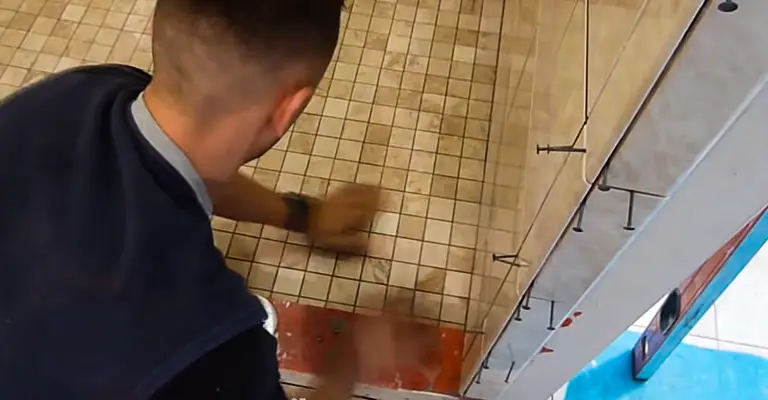
After placing the tiles secure them by using adhesive. Keep them set for an entire day then apply grout covering all of them. These multiple layers will be a properly sealed shower floor. You can further read our in-depth article about tiling a shower curb.
Tips for the best results
Ensure proper drainage slope
We covered the main steps of how to build a concrete shower pan in the previous section, focusing on layering the pan and tiles towards the drain. This slope is one of the most important construction details in any shower pan. Technically, a shower pan refers to the sloped floor in a walk-in shower enclosure and is designed to enable easy water drainage with a “self-draining” system. The best way to achieve this is to make sure that the surrounding drain area is sloped towards the drain itself. Water that collects on the shower floor will then be directed to the drain easily. Also, any water that sneaks onto the PVC pan liner will get redirected back into the drain through the side holes – which is why shower pan drains have specialized installations to cover all the vertical layers from the pan to the tiles.
The slope should start from the shower floor edges to the drain, so you will tackle this stage during the mortar mix pouring step. A slope guide kit with sticks can be used to stencil the area as sloped segments before adding the mix. Such slope guides take the guesswork out of your DIY project and allow you to build a consistent dip all around the drain. You will generally need the following tools, materials, and kits to help you out both as an expert and a DIYer: a PVC shower pan liner, an adhesive bond, some cement glue, floor mix mortar, shower drain with assembly, a cordless drill, a trowel, framing materials, a Quick-Pitch slope guide kit, and a level tool.
Waterproof the layers
Another equally important feature of a good concrete shower pan is its level of waterproofing. While ready-made shower pans are quick and easy to install, the benefits of building your own concrete shower pan include flexibility and customization to suit your space. This also means that you have more control over the waterproofing details of the whole setup from scratch.
Even as a DIY installer, you can build a leak-free shower pan that easily outlasts a ready-made unit – as long as you follow the correct guides! You have to give each layer the time it needs to set and rest before the next layer can be added. The smallest gaps, cracks, or holes in the concrete mix will eventually cause leaks down the road and spread massively before you even spot the damage. To ensure ideal waterproofing, you can use mortar and grout on the pan and tiles to cover the edges and seal them perfectly. The concrete mix also needs to be leveled smoothly with a trowel to press the layers and fill any gaps.
Another important step is to include a PVC shower pan liner as a middle layer on the sloped concrete pan. The liner essentially separates the water-prone regions from everything else in the ground. This creates a powerful waterproof barrier that captures any escaping water under the tiles and redirects it back to the drain – which is why a sloping surface will help a lot! The combination of a liner and mortar/grout will prevent leaks in your shower pan, reduce the chances of mold growth, and make your installation more durable. Throughout your DIY project, try to allow more ventilation in the bathroom by opening the window and turning on the exhaust fan so that things dry up better before the next layer is assembled.
Take care of the technical details
Technical aspects in building a concrete shower pan include all the measurement stages as well as the drain setup. Getting these details right will create a shower pan that is both functional and aesthetically pleasing. Accuracy is a major ally for this whole process, so do not hesitate to call in a professional if you need help! You can keep the drain top covered with some tape or plastic to prevent clogging and cosmetic damage from the concrete mix. The mud base needs to account for the tile height as well as the drain top so that once the tiles are in place, they actually stay level with the drain. For this reason, the mud base around the drain needs to be 1-inch thick or more depending on your installation.
Also, take special care to smooth out the liner generously throughout the concrete bed, corners, and curb to keep it flat for maximum coverage as a single sheet. Otherwise, it will expose the shower pan areas once the mix is poured on top – completely defeating the whole purpose of a waterproof middle layer. You certainly do not want the liner to be cut and layered as separate pieces because then the water can sneak into the ground easily. Remember: gaps are the enemies here!
You can also first clean the mortar bed to make it smooth before adding the liner or use a felt sheet underneath the liner to protect it from the rough surface and keep it tear-free. Avoid using staples, nails, or any sharp tools on the liner for the same reason. You can instead use an adhesive bond to attach the liner to the edges and curb and create a seamless, waterproof barrier. Lastly, the strength and quality of your mortar mix will determine the effectiveness of your shower pan. You can follow the instructions of the mix options you buy to get the best consistency and results. Generally, dry mortar mixes are ideal for creating a concrete shower pan that has better compression strength and longevity.
Shower pan kits for easy installation
Here are 3 shower pan kits that you might find helpful as a DIYer. They are designed specifically for shower pan installations and have been popular among DIY users who were searching for the right tools to simplify their work.
Oatey 41620 5′ x 6′ PVC Shower Pan Liner Kit with Dam Corners, 40 mil, Gray
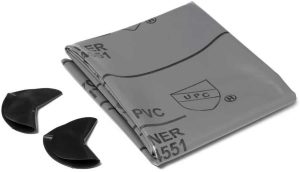
Oatey PVC shower pan liner kit includes a 5′ x 6′ PVC shower pan liner sheet and 2 PVC corner dams. The liner has a 40 mil thickness and features a universal, ready-to-use design. It is calibrated to help you cut, trim, and measure the sheet easily for the perfect fit within your shower pan. The material is resistant to abrasion and lasts long, which is what makes the liner a very suitable, hidden waterproof barrier in showers, saunas, tubs, etc. It is also UPC, SBCCL, and BOCA-listed and meets the ASTM Specification D4551. If you prefer, you can also buy the Oatey bonding adhesive separately to complete this kit. The adhesive and dam corners make a great combination and provide a waterproof seal for securing your concrete shower pan.
The illustrated guides were another highlight for DIY users as they found these instructions to be pretty straightforward – even as a beginner.
EZ-FLO 15301 PVC Low-Profile Floor & Shower Drain, 2 inch x 3 inch, White
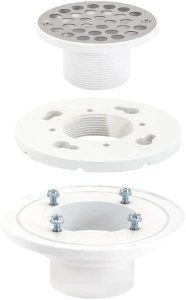
EZ-FLO offers a PVC shower pan drain with the required assembly. Measuring 2 x 3 inches, this white, low-profile drain is designed to fit concrete shower pans that include a waterproof liner in the middle level. So, it is an excellent choice to go with the Oatey PVC liner above (they are also a “Frequently Bought Together” pair). The combination will enhance your shower pan’s waterproofing ability by capturing and redirecting any excess water down to the drain. You can install the drain easily using the 4-inch screw-on setup. The low-profile design and DIY-friendly installation have garnered lots of positive reviews, so if you have a bathroom remodel planned ahead, this PVC drain kit is sure to stand out in your new shower area!
Goof Proof Standard Liner/Drain Shower Floor Kit
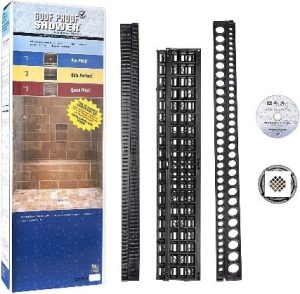
Finally, it is time for the big reveal, and the spotlight goes to the Mark E Industries Goof Proof slope guide kit! Featuring a Quick-Pitch Float Stick system, this kit is designed to help you achieve a consistent dip towards a centered shower drain. It works by installing each stick from the edge of the shower area to the center drain – dividing it into “pie segments”. Once you have stenciled the shower pan in this way, you can pour the mortar mix and smooth it out with a trowel. The arrangement automatically follows the slope guided by the sticks, so this also helps you layer the tiles easily. This kit acts as a continuous cement backer for the mix and tile layers, conveniently forming a drainage slope that does all the work. If you are a first-time installer, you will definitely find the stay-in-place guides very useful for accurate results. They remove the technical guesswork from your project, allowing you to work smarter, not harder! You will receive the following tools in the kit:
- 1 x Pre-Pitch Kit STD-201
- 2 x Kirb-Perfect KP-543
- 1 x SPL/40/6 Pan Liner 6 x 5′
- 1 x Shower Drain/Square
- 1 x Positive Weep Protector
- 1 x Quick Pitch QPK-101
- 1 x Installation DVD
Some users had to buy two kits along with extensions to fit their specific shower area, so make sure that you get your measurements right before placing an order.
Conclusion
Firstly you need to be patient to build a concrete shower pan. We know you are not professional in this case and that’s why we are here to help you. We have prepared this manual describing the whole process in the easiest way possible. We hope our instructions will help to build your own concrete shower pan.