It is very likely that you will need a quick shower just before going out for work or a visit. Similarly, when you return home after a tiring day, you will not appreciate the drizzle falling from your shower. If your shower has a low water pressure, you can remove the flow restrictor to give it a stronger flow.
It is also possible to have a weak water flow when your shower head is in the wrong position or your location has low water pressure. In most cases, however, you will get a better result by removing the restrictor valve.
In the US, according to federal law, shower heads are required to have a restrictor valve to be sold. There is more than one reason behind it-to save water during a shower as safe water sources are limited, save cost after water and energy bills, etc.
But the owner can decide whether he will remove the restrictor or not after buying the product. By removing it, you will discover a stronger water flow as water flow will be totally unrestricted without it.
Before going in deep you also like to read –
Best delta shower head
Best filtered shower head
Best rain shower head
Best low flow shower head
Table of Contents
What is Flow Restrictor?
A flow restrictor is a small device used to control and limit the amount of the water that flows through your shower head per minute. It is added with a showerhead as per the requirement of US law (keeping the maximum flow rate 2.5 gallons per minute) to conserve water.
This valve allows us to go some water through it, it restricts the maximum amount of water. To conserve water after removing the restrictor valve your showerhead should have different water settings.
That including a pause setting which will help you to reduce the flow to a very slow spray and conserve water during the time you do not need high water flow when you shave, soap yourself or scrub your body.
How to Remove Flow Restrictor from a Delta Shower Head
Now let’s talk about the delta shower head flow restrictor. You will need a paper clip or a needle nose plier, a wrench and some white Teflon tape to remove flow restrictor delta shower head. You may need a screwdriver if the valve is firmly attached to the head.
Disconnect the Head from the Wall Pipe
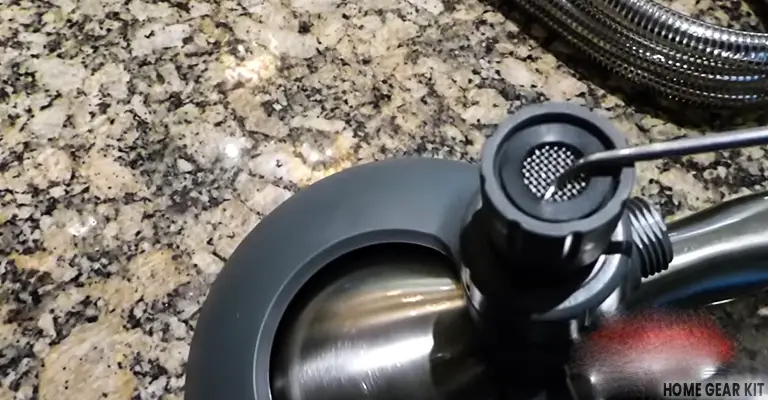
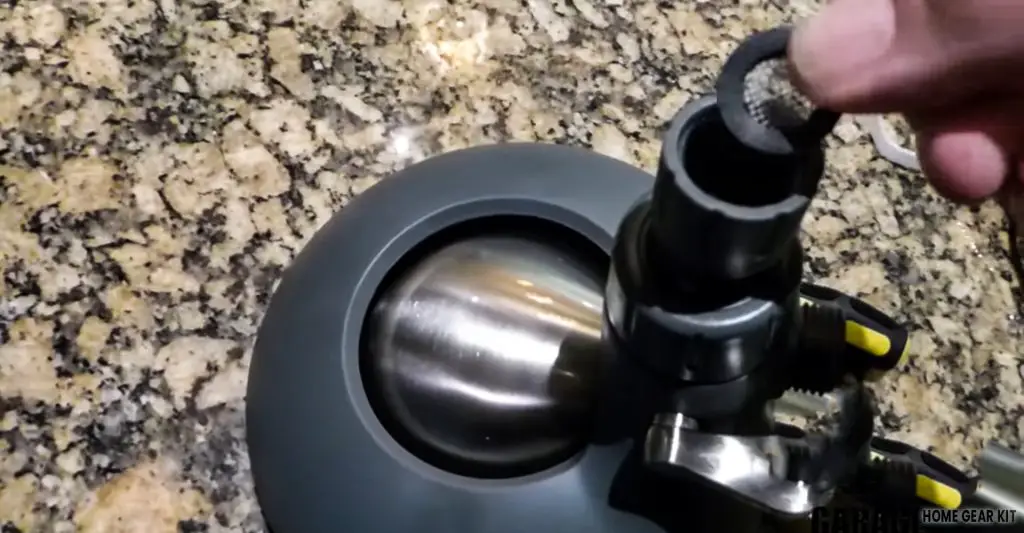
The restrictor valve is built into the showerhead assembly. It is placed inside the part of your shower head which is attached to the pipe. The first step of delta shower head water flow restrictor removal is to disconnect the head from the wall pipe (shower arm). Remove it by twisting it with a wrench and loosening it up.
Sometimes, your shower is placed on a swiveling ball joint. In that case, loosen it with the wrench. At that time, you should put a cloth or a rag around the shower arm and nut to avoid any scratch on the metal or plastic.
Remove the O- Ring and the Screen
After removing the shower head from the arm, you can see the inner portion of it. There you can see an O-ring which is the washer of the shower head that firmly holds the filter screen.

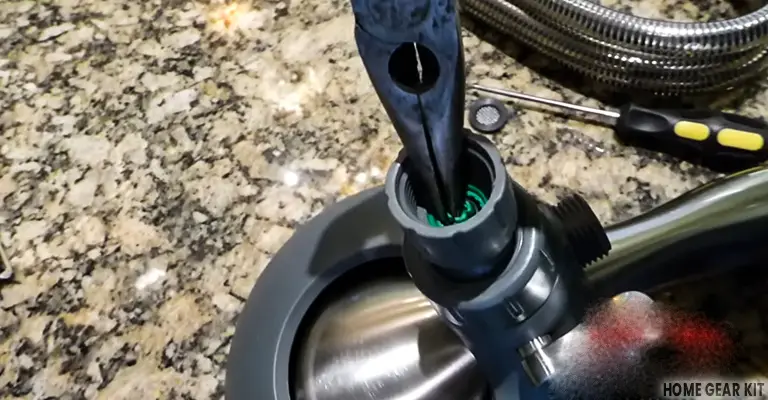
Now you have to remove the screen with the o-ring to reach the flow restrictor.Poke the O-ring with a paper clip or a needle nose piler and take it out. The screen should come out in this way. Do it very carefully because you will need them while reassembling the shower head. Keep it aside.
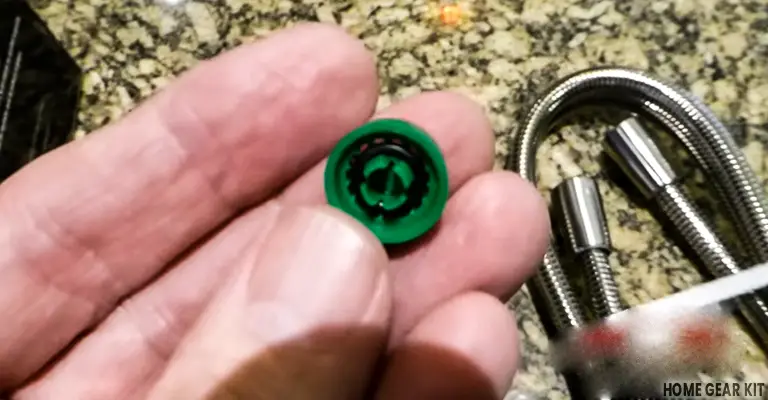
Remove the Restrictor Valve
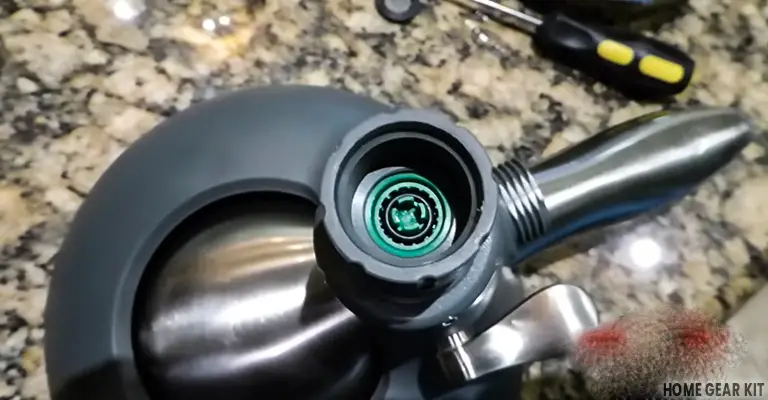
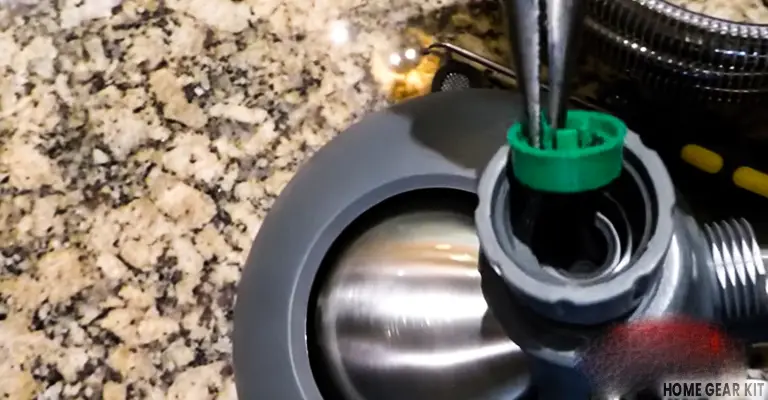
Now you will see a green/purple color tiny thing. The color may vary depending on the models of the shower head. This tiny object is the restrictor valve, which can restrict the huge amount of water from flowing through your shower head!
There are four tabs in the center and a few holes surrounding them. Grab one of the tabs and take it out with your needle nose piler or any pokey tool.
If you can not succeed with your piler, you can use a screwdriver too if it is attached tightly. It will definitely help you but, using a screwdriver will cause a little mess there.
So, the little culprit is now out of the way. Your shower head will now supply you ample water.
Reassemble the Shower Head
The next part of delta shower head flow restrictor removal is after removing the restrictor valve, put the washer and screen filter back in its place.
Press it firmly to set it in place.
Take off the old Teflon tape from the shower arm and put there some white Teflon tape to avoid any scratch on the body of the shower head or shower arm. Place the shower head and the nut in its place. With the wrench fasten the nut to firmly fix the shower head in its place. Now, you are done with it.
Even you can put it back in its place after removing it if you again need to do that. So, you should store that restrictor safely.
Some key precautions for Delta shower heads
Delta shower head types
Delta offers different shower options including fixed, rain, handheld, and 2-in-1 shower heads. So, the flow restrictor will be located differently depending on the type of shower heads you use. Both the fixed and handheld units include flow restrictors in the ceiling/wall-mounted and handheld parts. You will normally find a flow restrictor in the shower neck or wand once you remove the head from its fixed mount or hose. Also, the 2-in-1 shower head styles may include more than one flow restrictor – one for each outlet. You might have to remove both flow restrictors in these cases if you want a better, combined water flow result.
All Delta shower heads are designed for maximum efficiency and water conservation benefits. They come with a range of spray settings. There are options for multiple nozzles on the spray surface if you want additional spray coverage – the Delta rain shower heads are ideal for this purpose.
You can choose spray patterns like full-body spray, massaging spray, shampoo rinsing, soft drench, soft rain, etc. The shower heads also feature different finishes and technologies to suit the requirements of a modern home.
For example, WaterSense® showers use up 20% less water while delivering unique shower experiences. Various 2-in-1 Delta shower heads include a special MagnaTite® Docking system that has an integrated magnet to hold the shower head or wand securely. The H2Okinetic hand showers create a wave pattern from reduced water flow – because of the flow restrictors – and still offer the same effect as using high-pressure showers. Since all these innovative features rely on the use of a flow restrictor, make sure that removing it does not limit your required spray range. You could remove the flow restrictor if you just want increased water flow and do not care much for fancy spray patterns.
Cleaning the shower head parts
Before reassembling your shower head minus the flow restrictor, make sure to clean the mesh filter, inner spray surfaces, and rings to remove any debris or dirt. The main idea behind removing a flow restrictor from your Delta shower head is to increase the water flow. So, if you reinstall everything without cleaning the parts, the water pressure will still remain limited because of the stuck debris in the screen filter or flow restrictor. The good news is that Delta uses soft rubber Touch-Clean® spray holes that prevent excessive mineral buildup and can be cleaned easily without chemicals. Also, the Lumicoat™ Finishes on these shower heads create a barrier against hard water stains so that your shower units look as good as new.
You have already disassembled your shower head to reach the flow restrictor following the instructions above, so simply wash the screen, ring, and restrictor under water before installing them back. To clean the actual shower head surface, you can soak it in a simple vinegar solution overnight to dissolve lime deposits and other buildups. You can always use a toothbrush to clean the inner parts and the spray surface for thorough cleaning.
Advice on flow restrictor removal
Based on the steps discussed in this article, you can easily remove the flow restrictor from Delta shower heads. However, there are some key reasons why the brand recommends not to do so.
Flow restrictors are the main parts of Delta showers because all water efficiency and conservation aspects depend on restricted water flows. This includes the unique range of spray patterns and settings that you receive for a refreshing shower experience. By removing the flow restrictor, you might end up losing these spray features and not be able to fully enjoy the different configurations. In designs like rectangular rain shower heads or 2-in-1 combo units, maximum spray coverage is achieved by converting the low water pressure into optimized spraying patterns. The result is that you receive a shower experience that is very close to the one offered by full-pressure units. Once the flow restrictor is removed, this level of water conservation is automatically lost.
Other features like H2Okinetic can be compromised because they rely on the controlled flow rate from the restrictor. The Pause setting will be affected similarly. It is meant to reduce the full water flow to a gentle trickle and comes in handy when you do not want to turn off the flow entirely – like when you use hot water, the Pause feature allows it to keep flowing very slowly and not build up behind the valve. Without the flow restrictor, this function can be lost as well. You will have to turn off the shower head completely – and risk the dangers of full-force hot water!
If your local codes state a specific flow rate that you need to adhere to, then this is also something important to consider. Shower heads without their flow restrictors no longer conform to the minimum flow guidelines, so make sure to check with your local codes. Some areas that experience water shortages do implement conservation technologies like those offered by Delta shower heads. It will actually be very selfish to break those rules and use more water per minute compared to others. Another drawback of flow restrictor removal is that it can void your Delta shower head warranty as the product is no longer water-efficient. If you end up with hardware issues or need a repair, you cannot use the warranty benefits anymore as your reassembled shower head minus the restrictor is not eligible for Delta warranty.
Considering these long-term setbacks, if you do choose to remove the flow restrictor from your Delta shower heads, make sure to reassemble everything accurately – or get some professional help. This is because improper or faulty re-installation can lead to water leaks and hardware damages. You do not want short-cut DIY tricks to ruin your expensive Delta hardware and sleek finishing. In some cases, the reassembled shower head will not work as smoothly as before and cause noise, splashing, and more frequent debris buildup. Quite often, the low water flow is due to dirt and debris blocking the screen filter and restrictor holes.
You can check for such deposits and wash them away to improve the water flow without removing the restrictor.
So, that is all about how to remove water saver from the delta shower head. The removal of the flow restrictor is recommended for the adjustable shower head. Even if your shower head is from Oxygenics, you can read this thorough article instead. Now your shower head will flow water at a better speed.